It's Surprisingly Easy Once You Have the Right Equipment
 Stephanie Delwhit
Professional sous-chef for five years, mother of two
My background is in fine dining. Although I don't cook professionally anymore, I love cooking at home for my kids. My husband and I made this site to help people who cook at home, and part of that is suggesting quality products. If you buy something after clicking our links, we earn a commission from Amazon regardless of which product you choose. This doesn't affect the price you pay at all, so please support our site by clicking our links if you're interested in the products.
What is Teppanyaki?
Teppanyaki is the combination of two Japanese words: Teppan which means "metal plate", and yaki which roughly means "grilled" or "roasted". However, besides meaning just "grilled on metal plate", the word has come to mean a distinct style of food preparation.
Teppanyaki chefs in America typically cook beef, chicken, shrimp (and other seafood), as well as a variety of vegetables. Because Teppanyaki is cooked on a flat griddle, the juices from the ingredients don't drain away. Instead, they stay in contact with the food to produce wonderful flavors. This is a big difference from regular grilling.
In Japan, the Teppan is used more broadly to also cook noodles, as well as various regional recipes such as Okonomiyaki (a delicious style of savory pancake). The Teppan is also one of the premier ways to cook the famous Kobe and Wagyu beef, possibly the tastiest (and priciest) beef in the world.
For a bit of backstory, Teppanyaki as a style of cuisine is relatively modern, and its origins are in post-war Japan. The story goes that American GIs stationed in Japan in the 50s didn't much like traditional Japanese food that was cooked on the Teppan, so the Japanese chefs started throwing in meat to cater to them. Later on, the style made its way to America where it became incredibly popular.

Can You Cook Teppanyaki at Home?
I first experienced Teppanyaki at a restaurant near my home a few years ago. My family went to our local Benihana to celebrate my son's birthday. It was such an awesome experience for the kids who loved watching the chef perform tricks.
I was actually more impressed with how the food tasted. The chefs bang and twirl in front of you on a griddle, so I didn't have high expectations. But despite the acrobatics, the chefs are very attentive to the temperatures and cooking times of the food. Once prepared, the food goes right onto your plate while still smoking hot. The meal was delicious and quite filling.
While we were there, I couldn't help thinking of how we could recreate this at home. I imagined all the different things I could make with it. We could cook steak, seafood, and veggies and I could whip up some of my own sauces to complete the dishes.
When we got home, I started researching all I could about Teppanyaki. I realized that learning to make Teppanyaki wasn't hard at all, and the only thing I needed was a griddle. Once I bought the griddle, I started experimenting right away and learning how to make the food taste great. My family has been enjoying Teppanyaki at home ever since.
Since then, I've actually traveled to Japan myself. The Teppanyaki experience there was quite different. There is no showmanship from the chefs, but so much more complexity to the food that they make. I finally got to try Okonomiyaki - a famous dish cooked on the Teppan. It's usually described as "a savory pancake", but this description falls way short of what it actually is. Luckily, if you're not going to Japan anytime soon, you can make all of this at home!
This is a guide for making your own hibachi-style food at home. It's pretty easy to get started, just make sure you have a high-quality griddle and be willing to experiment.


Hibachi Grill or Teppanyaki Griddle, What's the Difference?
There's some confusion about this, because "Hibachi" is often used to refer to two distinct styles of cooking. In fact, it is a misnomer for both of them. The first usage refers to a cast-iron BBQ grill with a grate on top which uses charcoal for heat. In Japan, these types of grills are known as Shichirin.
In this article, we're talking about Teppanyaki, which is cooked on a flat, metal griddle. The griddles used for Teppanyaki in restaurants are usually quite large, and the commercial versions can cost several thousand dollars.
In Japanese, the word Hibachi actually refers to a charcoal heating device, which is a brazier that is typically not used for cooking at all!
What Do You Need to Get Started?
Equipment
1. The Griddle
This is the main thing you need to get, if you don't already have one. The griddle needs to be flat, not grooved. A larger size will work better for Teppanyaki so you have more space to maneuver. The best griddle for you will depend on how you intend to use it:
- Do you want to cook inside or outdoors?
- Do you want it to be portable?
- Do you want something purely functional, or use it to entertain guests?
I list my picks for the different styles of Teppanyaki griddles below.
2. Grilling Tools
You'll want tongs and a spatula. I recommend using metal tools so you can easily scrape the griddle, unless your griddle has a non-stick surface that can get damaged. If you already have a set of grilling tools for your barbecue grill, they'll work great.
Ingredients
1. Protein
Steak works great. Look for well-marbled, fatty cuts that can be cooked quickly and still be tender. I recommend ribeye or chuck short-ribs. Slice thinly across the grain, aiming for 1/8-1/4 inch thickness.
For seafood, shrimp is the easiest option but shellfish in general works well. You can also chop up (cleaned) lobster tails. Experiment with abalone if you can get it, clams, and scallops.
You can also use tofu if you're a vegetarian! I recommend using hard tofu diced into half-inch cubes.
2. Vegetables and Mushrooms
Mushrooms really excel in a Teppanyaki preparation. I really like using shitake, oyster, and king oyster mushrooms when I can get them. However, feel free to use regular white button mushrooms too.
For vegetables, you have many options. In general, anything that's good for grilling is good here too. Some of my favorites are: zucchini, bean sprouts, shishito peppers, red onions, scallions, leeks, and cabbage.
3. Starch
This isn't really a requirement, but I love having Teppanyaki with rice or noodles. You can either have them as a side dish, or add it as the last step in your preparation to make a delicious fried rice or stir-fried noodles. Make sure to precook the rice or noodles first if you want to mix it in.
4. Sauce
I recommend making your own Yakiniku sauce for an authentic taste to your Teppanyaki. Simply dip the grilled food into the sauce as you eat it. You can also find a pre-prepared sauce on the shelf of a Japanese grocer near you.
If I don't want to go through the hassle of making the real sauce, I make a much simpler sauce that still delivers a lot flavor. Simply put some grated garlic into soy sauce and let it soak in the fridge overnight or longer. I use a large proportion of garlic (5 cloves or half a head) in 1/2 cup of soy sauce. This garlic-infused soy sauce is really good with meat!
Cooking Teppanyaki
Once you have the right ingredients and equipment, you're ready to get started! You can either start by following a recipe, or just experiment by giving it try.
The preparation itself is quite simple, but it's somewhat of an art to cook all the ingredients to the right degree of doneness. Below are my tips for getting started.
Prep
- In general, most of the ingredients should be thinly sliced (1/8-1/4 inch)
- Make sure to chop and lay out all your ingredients before you start cooking
- Preheat your griddle to 375-425 degrees
- Grease the griddle with oil that has a high smoke-point (canola, avocado, and peanut oil works great)
- Don't use virgin olive oil or butter
- You don't need to grease the griddle when cooking highly-marbled/fatty meats
Cooking
- Throw the meat and vegetables onto the griddle and season them to taste
- Keep in mind the saltiness of your dipping sauce when seasoning
- Flip your ingredients to cook all sides and get a nice sear
- Keep watch! Some ingredients will cook faster than others
Serving and Cleaning
- Portion out the dipping sauce for each person
- Serve the cooked food right away
- Clean the griddle as soon as you can
Recipes
- General Teppanyaki recipe by Nami
- Beef and Vegetables
- Steak and Shrimp recipe (Video)
- Okonomiyaki
Buying a Teppanyaki Griddle
The right choice of griddle to use for Teppanyaki really depends on your situation and how you plan to use it. Unlike our guide to the best non stick pan, it's hard to select just one "best griddle".
- Do you want to cook inside or outdoors?
- Do you want it to be portable?
- Do you want something purely functional, or use it to entertain guests?
- What's your budget?
The simplest option that will work for most people is to get a standalone electric griddle that can be used in doors. This is something very common in Japanese households. The main downsides to this kind of griddle is that you have to manage the smoke while cooking, and the area of the cooking surface is limited.
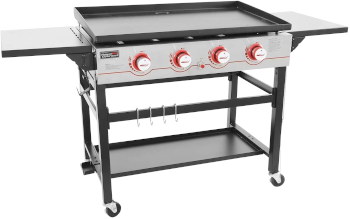
On the other hand, you could get a standalone outdoor griddle. This is just like a regular BBQ grill that runs on propane, except it has a flat griddle surface instead of a grate, along with other optimizations.
My family actually has both. We first bought the Royal Gourmet outdoor griddle, which is great and we use it a lot in the summertime. Later, I also bought the Zojirushi electric griddle to use indoors in the colder months. I like having the flexibility of cooking Teppanyaki whenever we're craving it. But if I had to choose just one, I'd keep the Zojirushi because it's so convenient.
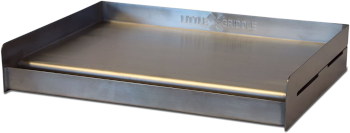
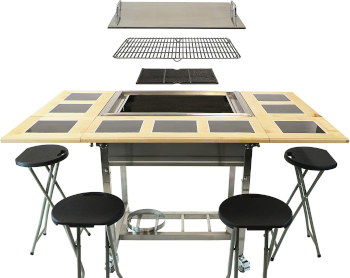
There are some other options to consider as well. The cheapest griddles are just metal toppers which can go on top of an existing BBQ grill, if you already have one. LittleGriddle makes one that's inexpensive and gets great reviews. However, if you want something with more flair to entertain guests, My Hibachi BBQ makes a grill/table combo. This is just like the Benihana experience, where your guests can sit around you while you cook!


Key Features
- Cooking surface: 19" x 12.5"
- Light and portable electric griddle
- Easy to use and clean
- Made by an established Japanese Brand
- Ceramic non-stick coating
Drawbacks
- Indoor griddle will smoke, so you need proper ventilation
- Avoid using metal tools and clean with care, the non-stick coating can get scratched
This electric griddle from Zojirushi is a gem. It's light and compact, so you can pull it out when you need it and then stow it away after cleaning it. I have one of these myself, and it works very nicely for Teppanyaki. It's made by an established Japanese brand, so you're getting something that's really been optimized for this purpose.
Just make sure to open your windows while you're cooking, and be wary of your smoke alarms. The griddle may smoke a bit, but it's really not a problem with good ventilation.
Key Features
- Cooking surface: 36" x 22"
- Standalone outdoor propane griddle
- Grease drainage is a bonus
- Great quality for the price
Drawbacks
- Needs some initial assembly
- Outdoor use only
- Grill must cool down before cleaning
This Royal Gourmet griddle is an incredible deal for the price, and we're very happy with it. It's a larger cooking surface than the electric griddles, and overall it's a better experience for cooking Teppanyaki. The propane burners let it get hotter, and having a grease trough and drainage is very useful.
Smoke isn't an issue outside, just make sure you have the space for it in your yard or patio. It requires some assembly out of the box, but it's not too difficult. If you've successfully put together some IKEA furniture before, you probably won't have too much trouble getting this set up.
Cleaning it is in some ways easier and in some ways harder than the electric griddle. You won't be removing the cooking surface, so you'll need to scrape it in place and then scrub with a wash cloth. Just remember to clean after the surface has already cooled down after cooking.

Key Features
- Cooking surface: 18" x 13"
- Inexpensive steel griddle top
- Use on top of a heat source (bbq grill)
- Grease trough is great
- Some people have use it inside on top of an electric stove
Drawbacks
- Stainless steel surface is best cleaned promptly
- You need to make sure you have a compatible heat source
- Space between heat and griddle can make it slow to heat up
It's small, but it should get the job done. The great thing is that if you already have a BBQ grill, this is just like an attachment you can put on top whenever you want to try making Teppanyaki. I love the fact that it has a grease trough, because from using the Royal Gourmet I've found this to be a very valuable addition.
However, the small surface means that it might get a little cramped. I'm also not sure how well it will heat up since the surface is elevated above the burners. You'll probably need to consider the dimensions of this griddle compared to your grill to work out if it will fit well.
Key Features
- Cooking surface: 27" x 20"
- Standalone and propane-powered
- The grill has table space built in around it for sitting/eating
- Comes with 4 stools
- 3-in-1 flexibility: switch between a flat griddle, bbq grate, and stove top surfaces
Drawbacks
- Quite pricey!
- Some reviews report quality concerns
This seems like a great idea: you can pretend to be a chef in your own Teppanyaki restaurant! However, the price tag is significant, and given the relatively sparse review history of the product on the online retailers that I looked at, I'm not sure I'd go for it personally.
Still, the concept is really intriguing, and might be worth a try if you can afford it. Looking at the photos of this product I can almost feel how awesome it would be to use this setup when having guests over.